


Have you ever started a tradition with your first child that seems to carry on? When Saige was born, my Mom bought a kit to make a little stuffed lovey from a Beanie Baby, and it was such a fun idea. Saige loved her “Lamby” enough that when Brynley was born, I had to make her a stuffed lovey as well. “Hop” is just as loved as Lamby. They both want their loveys to go to sleep and on long trips, and it’s so fun to have something cuddly and soft to give your kids.

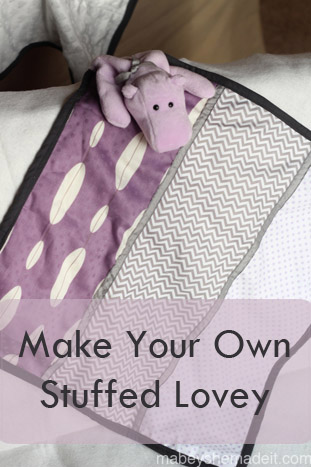
As soon as we found out the newest Miss Mabey was a girl, I started thinking about the stuffed lovey I’d make her. What animal should I choose? I spent some time narrowing down my choices then called Chad in to help me make the decision. And the winner was this adorable little purple hippo.
Then came choosing fabric–one of the hardest things for me because I can’t stop comparing and trying different things. But I finally narrowed it down to three prints, solid white Minky for the back, and a charcoal gray binding. (Both the minky and the gray chevrons have been Pick Your Plum deals–awesome, right?) When that combo finally came up, I knew it was the right choice. The thing that’s so fun about these little loveys is that basically you’re making an 18″ block and you can do it however you want.

Lamby is a 9-square pattern and solid back. Hop is one fun print on front with a coordinating binding. For the hippo, I decided on 3 panels, binding, and ribbon accents. It’s just fun to do whatever you want with them.

So let’s get started!
- Cut a 6-1/2″ x 18″ piece from each of your front fabrics. Cut an 18″ square from the backing fabric. You’ll also need enough double-fold bias tape to go around the outside of the lovey. If you want to make your own, here’s a great tutorial.
- To make the front, sew your front fabrics together along the 18″ sides in the order you want them. Then press your seams well.
- Now comes the most painful part of the whole process (emotionally). Take your cute little stuffed animal, and cut off the back legs. If you’re working with a Beanie Baby, get all the beans out of the way and have a bowl or cup ready to catch all those crazy beans. Note: when choosing an animal, you want one that’s not contorted. Animals that are sitting or twisted or bunched up at all will be harder to work with.


- Take out some of the stuffing/beans from the body of the animal. I typically leave the stuffing in the head, but take out any extra fluff. I fill the arms with beans and leave some in the body, making sure there’s at least 1-1/2″ of empty body for me to work with. Then, for your sanity, you’re going to want to baste it closed. No more runaway beans to deal with!
- Okay, now that the animal is prepped, take your backing fabric and lay it right side down. Then take one corner, and fold it down just wider than the animal. Lay your animal on top like this.


- Now do the same for the front piece only put it right side up and flip the corner under so it matches the bottom piece. Now pin your critter in there!


- Topstitch close to the folded edge. Now flip everything inside out and sew a couple more lines of stitches (for reinforcing) on the inside. Make sure your animal is in there really good.
- Now comes the easy part. Baste around the edges of the blanket portion. Stitch your ribbon pieces over the seams (if desired) through all the layers so everything’s “quilted” together.


- Sew on your binding and tie a bow around the critter’s neck and you’re done!


There’s just one thing I have to mention–if you’re going to introduce this stuffed lovey as a comfort item, you may want to consider making two–in case one gets lost, destroyed, or is just in the wash. Saige and Brynley both have two identical loveys that get switched out. Two is better than one!

Now whether you’re in the mood to sew up a softie or a new little outfit for your little cutie, you’re not going to want to miss the next giveaway. Tie Dye Diva Patterns is offering the winner a 3-pack of patterns of their choice, so you can definitely find some fun things to sew up.
a Rafflecopter giveaway
Melanie at The Crafty Cupboard is sewing up one of these adorable patterns today; go check out her little peas in a pod!