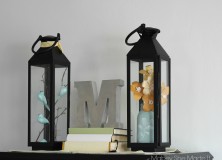

Recently I was rearranging my decor, and I ran into a problem. I needed something tall to go in one of these lanterns, and didn’t have anything around the house. These paper plumerias were the solution.

I wanted something that would complement the birds on the branches in the other lantern and I didn’t want to have to go find something specific–partially because I don’t want to take three kids shopping yet…. And since my crafting time is limited these days (getting all three girls to nap at the same time is a feat) I needed it to be fairly quick to boot.
So I went to my little room and did what I always seem to do when I need new decor–I pulled out the card stock and patterned paper. Working in a stamping/creative company for 5 years has its benefits. Besides the HUGE stash of paper. I’ve also seen some amazing home decor made from paper, so I gathered some basic supplies and started to play. The paper plumerias were the outcome, and I love how fresh and awesome they look. They’re just the look I was going for!

To make some of your own, you’ll need:
- 1 sheet each of card stock and patterned paper
- White paper scrap
- An Oval punch
- A Scalloped Oval punch
- A Circle punch (I used a 1-1/4″ circle)
- Adhesive (I used a hot glue gun)
- Sticks
Let’s get started:
- Punch 5 petals from your card stock or patterned paper using the Oval or Scalloped Oval punches for each flower. You’ll also punch 1 circle for each flower.

- Snip small cuts into a 3/4″ strip of white paper or card stock to resemble fringe or grass.

- Cut to the center of the circle piece, and glue the cut edges together overlapping by about 1/4 of the circle to make a shallow cone.

- Take each oval piece, and curl it back using your fingers or a pencil to resemble a petal. Then, crease the center the opposite way to give your petal a more natural shape.
- Adhere each of your petals into the cone, only gluing down one side of the flower base. Continue around the cone until your five petals are attached.
- Roll a small section of your fringy white paper, and glue it into the center of each flower. Then when the glue is dry, separate the fringe as desired.
- Reshape your flower if necessary, and then glue them to branches for a natural look.

I love the depth that the cone-shaped base gives the flowers. Although they’re clearly not real (and not intended to pass as such), they have a more natural feel that I love. Then I put them in a painted and stamped mason jar and they fit just right into the lantern.

I love how the paper plumeria coordinate with the birds without being matchy. Although I’m tempted now to put tiny yellow buds on the birds’ branches. Thoughts on that?


I'd love to hear your thoughts–leave me a comment!