Yea! I’m so happy to have made it to week 3. I love working with stripes and the beautiful things that come with the symmetry, angles, and juxtapositions of strategically placing positive and negative spaces. But don’t get me wrong–working with stripes and trying to do something exciting and “new” is a daunting task. I am really excited about the pieces I made this week though, and can’t wait to share the details with you, so let’s get started!
I knew immediately I wanted to make this week’s look bold and beautiful but still maintain the wearable element (although wearable means church wear, not playground here) that’s so important to kids. And although the fabric I used this week looks expensive and not kid-friendly, I assure you it is. I purchased these fabrics in the fabric district in L.A. last year and before buying I made sure they would wash and wear. They’re a poly blend so they’re durable, machine-washable, and they come out of the dryer without a lot of wrinkles (practically none, actually). It’s a mama’s dream fabric for kids. It looks elegant, but with none of the fuss.

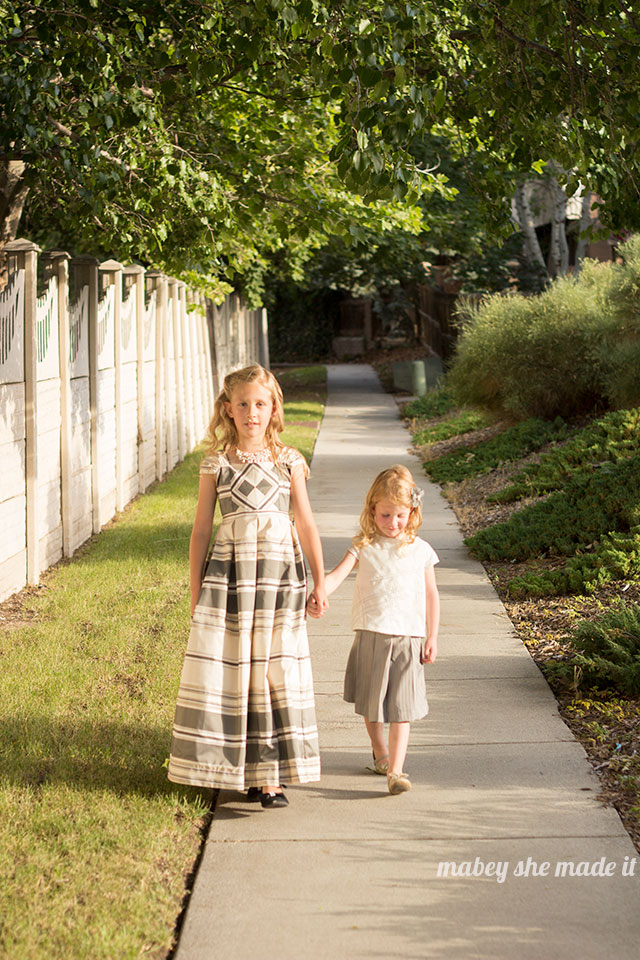
I knew I wanted to do something really intricate with the bold stripes, so I started looking for inspiration at clothing stores and boutiques but nothing seemed to spark my creativity. The problem was that my stripes were such a statement in and of themselves that I needed to find the hidden gem right in front of me, not anywhere else. So I started cutting stripes and playing with them, inspired by quilting rather than clothing. Now if you know me, you’ll know that i leave the quilting to the experts–it’s just not my cup of tea. But once I started playing with the stripes I knew I wanted to do a “block” as a focal point of the whole dress and let the rest of the dress build around it.

I loved how the small black stripe stood out so well and that became the main focus of the block. I fussy cut the stripes to create a diamond shape from both the ivory and gray sections and used them together to create alternating quarters of the diamond background. Then I used the same black stripe to “hold” the corners of the diamond like a setting in a ring and extended the stripe all the way around the dress bodice.

I didn’t want to disrupt the stripe or detract from it in any way, so I chose to close the back bodice with three hooks-and-bars rather than buttons so they’re hidden. I also hid the placket in the pleats of the attached skirt for a seamless look.

I created a box-pleated maxi skirt because I love the strong lines that a box pleat gives and knew it would be the perfect complement to the bold stripes. By matching the stripes across the pleats I get a more simple visual but with detail and fullness that I couldn’t achieve with a gathered skirt.

When Saige tried it on, she kept telling me she felt like a princess, which is exactly how a girl should feel in a fancy (yet wearable) church dress.

The second look came together after I realized how hard it would be to put anything next to the first dress (HA!). Really though, the second look had to be a complete opposite to the first in order for them to work together. So I took a gray pinstripe fabric for a pleated skirt and paired it with a simple ivory top. It’s the perfect balance, and I had so much fun with the ivory top.

I went looking for inspiration again, and found it in vector images. I loved seeing all the geometric designs people created using just lines–stripes of color against a background. And I knew I wanted to create that same feel on the top. I also wanted it to have a similar feel as the dress, so “quilting” the design onto the fabric felt perfect.

I used a charcoal gray thread and a triple stitch to follow the parallel and perpendicular lines I drew onto the front, making sure they were straight and bold. I also wanted the back side of the stitching to look neat, and I love seeing the inside of the garment almost as much as the front.

I used the Norah dress/top from Mouse House Creations as the start of the top, and narrowed the A-line, reimagined the back, and switched out the sleeves for something smaller. I also put the lined bodice together using the burrito method so the sleeves are fully incased in the shoulder seam for a beautiful finish.
In the back, I dropped the back neckline and added a bow tie across the back so this seemingly simple top also had a fancy element to it. All together I love the silhouette and everything about this top.

In creating a skirt to go with it, I kept it simple. I used the pinstripe vertically everywhere except the waistband for a fun contrast and did a center box pleat flanked by two knife pleats on both the front and back. I also added an inseam pocket and an invisible zipper closure with a bar and hook at the top. I did use a little elastic in the waistband for my skinny girl to snug things up a little–the closures are definitely necessary for both dressing and for keeping the final look sleek.
And on the other side seam I gave her an inseam pocket–just right for her “lipstick” and other treasures.

Overall, I love how using stripes (which I do regularly but in a much more literal manner) pushed me outside my comfort zone and got me to think about stripes in a whole new way. My graceful geometric creations are pieces I’ll love for a long time to come. My only regret? That that top isn’t my size. 😉
Now it’s time to click over to Project Run and Play to vote–this is the last week for elminations, and I’d love to make it through to the final round! So go check out all the other striped imaginings and vote please!

Click Here to Vote


I'd love to hear your thoughts–leave me a comment!