
While we were in California, I found this chair at a thrift store. It was well made, beautiful in its features, and I just wanted it. It wasn’t quite my style, but I knew with a little love it would be.
Enter in moving, temporary living, and now some renovations to our new house, and it still sat looking like this:

So when DecoArts let me pick out some Americana Chalk Paint, I knew exactly what project I’d be using it on–the thrifted chair!

But before I could start painting, I had to do some seat recovering. Here’s how it went down.
- Remove screws on bottom of chair to release the seat
- Use a screwdriver and pliers to remove all the old staples and take off the old fabric and foam. (This is the worst part of the whole project in my opinion).

- Replace the foam (if you want to)–I wanted something a little thicker, so I used a 2-in. foam and cut it with an electric knife to one inch bigger on each side than my seat board.
- Then I cut my fabric about 3 inches larger on all sides and started stapling it down. I did the sides first, and then did inverted pleat corners. As a side note, I also got this upholstery fabric at a thrift store–I got 4 yards of this lovely, simple mustard fabric for $8! And there’s a lot left, so you’ve been warned that it may make another appearance somewhere in my house. And I’ll probably like it just as much next time.

- Next up is a first coat of Everlasting chalk paint and let it dry. After that, I applied some Yesteryear (gray) paint to the detailed areas. I wanted them to be darker and more defined than the rest of the chair, and I didn’t want to tint my wax to get that effect.

- After that, I painted a second coat of Everlasting paint to the whole chair, trying not to get in the nooks and crannies.
- Then comes some sanding. I didn’t sand a ton but I did go over the parts that would naturally get the most wear so the Yesteryear would show through. I kind of like how its subtle but different.

- After that, apply the wax using a wax brush or soft cloth and let it dry. Then buff your little heart out until the finish shines.
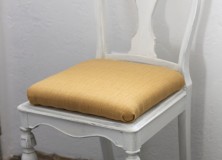
- Screw the finished seat back on your chair, and it looks completely different!

For now, it’s hanging out in my craft room at the desk, but I’m not sure where it’s permanent home will be. 
I love the look of it with a pillow sitting on it, and the living room might be the big winner here.

So what do you think of my thrifted chair? Would you have done the gray details differently?


I'd love to hear your thoughts–leave me a comment!