 At the beginning of the month, I got to share a fun project over at The Ribbon Retreat where I was a contestant in a blogger challenge. Four of us were given the same supplies and asked to create a project. I made this fun boxy zipper pouch, and love how it turned out.
And now today you get to vote on your favorite project. So if you have a minute, click over and vote! Of course I’d love it if you voted for my boxy zipper pouch, but no pressure–just vote for the one you like the best!
VOTE HERE

Hi! I’m Lisa Mabey from Mabey She Made It, and I’m so excited today to be part of this round of the blogger challenge. I have some amazing competitors, and I’m so excited to see what they did with these same supplies. And I’m super excited to share this boxy zipper pouch tutorial with you because it turned out so fun.
The other day I received a little zipper pouch with the coolest folds on the ends. It opens really wide, holds a ton, and is overall a pretty impressive little pouch. And being the curious girl I am, I had to figure out how they created it. So in a flash I had it emptied out, turned inside out, and I realized how simple it was to put together. So today I’m showing you how to make one of your own.

Boxy Zipper Pouch Supplies
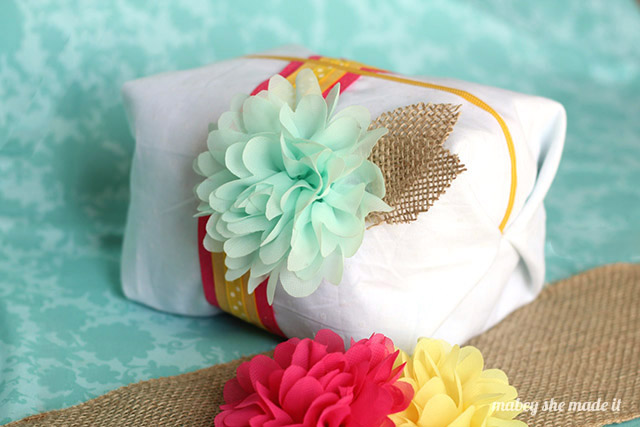
- 19″ x 12″ rectangles of 2 coordinating fabrics (one for the outside and one for the lining)
- 12″ or 14″ zipper
- 4 coordinating ribbons in varying widths
- Fabric flower
- Burlap ribbon
- Hot glue gun
- Sewing machine with Zipper foot
Instructions
- Stack 3 coordinating ribbons and sew them to your outer fabric rectangle starting in the center of a 12″ side and running the whole length (19″) of your rectangle.

- Lay your outer and lining fabrics together with right sides together, and sandwich your zipper along the 12″ side as shown.

- Sew along the outer edge of the fabric (including the zipper).
- To sew the other side of the zipper, separate your outer and lining fabrics so the free side of your zipper is sticking up a little. Then bring the free outer fabric to the free side of the zipper as shown. Repeat for the lining so your zipper is sandwiched between the two free ends of the lining and outer fabric, then sew and press.

- Turn your fabric so you have one tube of fabric with the lining fabric out. Place your tube on a table with the zipper centered on the top. Open your zipper a little.
- Create a pleat on either side of the zipper by tucking fabric in toward the fabric until they meet at the zipper. Pin in place.

- Sew along both edges, making sure to catch all the layers.

- Cut a length of your widest ribbon 4-1/2″ long and heat seal the edges by holding them close to a flame. Then sew the ribbon around your sewn edges to create a binding.

- Flip your pouch to the right side and you can see the cool boxy shape.

- Cut 2 leaves from your burlap, and attach the leaves and a fabric flower to the side of your pouch with a hot glue gun.

- Cut a length of thin ribbon, and thread it through your zipper pull. Tie a knot, and heat seal the ribbon edges to prevent fraying.

Now fill it with lots of fun things–beauty products, art supplies, your latest handwork, or a fun Mother’s Day gift. And here’s another fun version–I even watercolored the fabric (you can check it out here)!


I'd love to hear your thoughts–leave me a comment!