Are you ready for another fun Halloween project that I shared as yet another guest post? Can you tell I needed a little motivation to get in a Halloween mood? Ha. Just keepin’ it real. This time I got to share this Halloween Door Hanging over at I Dig Pinterest a couple of weeks ago, and now it’s coming home. So if your door is looking a little bare, this might be the project for you!
+++++++++++++++++++++++++++++++++++++++++

Good morning! I’m Lisa Mabey from Mabey She Made It, a DIY, craft, and sewing blog. I’m so excited to be here at I Dig Pinterest today because I love so many things about this wonderful blog including her tips of pinning–such great advice there!
Today I’m sharing a Halloween Door Hanging that I created for our front door.
This was kind of a time-consuming project because I did all the letters differently, but it definitely wasn’t hard. Would you like to see how I did it?
You’ll need:
- Chipboard squares
- Chipboard letters
- Black ink
- White ink
- Assorted Halloween scrapbook paper
- Yellow and Orange paint
- Crop-a-Dile
- Wide ribbon for the top
- Ribbon, string, and buttons for decorating the letters
- Adhesives (Mod Podge and glue dots or hot glue gun)
While I’m not going to do a full tutorial for each letter, I’ll walk you through the basics of how I created the whole door hanging.
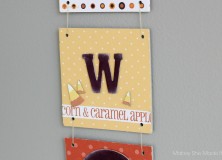
- Adhere your scrapbook paper to the front of your chipboard squares. Mine are 4″ square. Let dry, and trim any access.
- Ink your chipboard letters with Black ink using a sponge dauber or by rubbing your letters across an ink pad. I used a dye-based ink to achieve a more worn look, but you could use pigment ink as well. Let dry, then grunge up your letters with some White pigment ink on the edges. Let it dry.

- Tie ribbon or string around some of the letters as desired.
- Adhere the letters to the chipboard squares using glue dots or a hot glue gun.
- Add buttons, chipboard candy corn, paper, and other decorations to the squares as desired.

- Using a Crop-a-Dile or other strong hole punch, punch holes in each of the four corners of your chipboard squares.
- Tie the squares together using small lengths of twine or ribbon, and use a longer piece of twine to create a hanging loop at the top.
- Tie a wide ribbon bow at the top of the door hanging, and enjoy!

If you like this, I hope you’ll come join me at Mabey She Made It for more fun ideas like these:


Pinecone Garland || Metallic Acorn Wreath || Pom Pom Pillow Sham Tutorial
And a huge thanks to Christine for letting me guest post!


I'd love to hear your thoughts–leave me a comment!