Are you ready for spring? I am almost willing it to come, but I have to be a little more patient during these Idaho winters. But to keep me from going insane, I created this cute art to get me through the drearies. It was originally a guest post over at While He Was Napping, but I’m bringing it home and still loving it!
+++++++++++++++++++++++++++++++++++++++++++++++++++++++++++++++
The other day I was trying to come up with an idea for this guest post, and I started dreaming about spring–green grass, seeing what plants will poke up around our new house, planting a garden, warm temperatures…you get the idea. It made me start willing spring to come! If you’re stuck anywhere cold (which seems to be like a lot of places this winter), you may also be dreaming about spring. And then it hit me–what a perfect sentiment for this time of year!

And with that the Dreaming of Spring project was born.
I’m Lisa Mabey and I blog at Mabey She Made It about DIY projects, crafting, and sewing. Today I’ll show you how I made my framed art, and you can play along if you’d like!
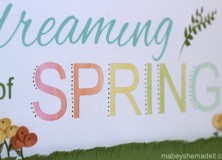
- Start by designing your sentiment. I designed mine in the Silhouette software, and I’m sharing it today on my blog for free. So if you want, hop on over to get the file then come back here!
- Cut everything in your file on White card stock except the word “dreaming” and weed out the letters. Then cut your card stock down to your desired size (the file is sized to fit in an 8 x 10 frame).
- Now cut out the word “dreaming” on an aqua card stock.

- Now take a piece of watercolor paper, and paint swatches of pink, coral, yellow, green, and aqua to put behind the word “Spring.” To get the swatches how I wanted them, I’d hold the white card stock over my watercolor paper and eye how big I wanted them. Let your watercolored paper dry.

- Now adhere your watercolor paper behind the word “Spring” and adhere the centers of the “P” and “R” on there as well.
- Adhere green card stock behind your white card stock so all the other cutouts appear green. You’ll also need to adhere the middle of the “O” at this point.
- Adhere “dreaming” to the paper as shown.

- Now we’re going to make the grass. Cut a strip of green card stock 1-1/2″ x 10″ and start cutting tiny snips into one side of it to look like grass. Then curl the grass with your fingers a bit, and adhere it to the bottom of the card stock.

- Finally we’ll make a few flowers. Punch three 1/2″ circles each from pink, coral, and yellow card stock. Then take each circle, and pinch a section and fold it over to create a blossom.

- Put a dab of glue on each blossom, then glue three blossoms together in a little cluster.

- Repeat for the remaining circles. Adhere to your card stock.

- If you want, add some doodles using an ink pen and then frame!

With something as cheery as this to look at, perhaps I won’t mind the snow SO much for a little longer. Spring will come eventually!


I'd love to hear your thoughts–leave me a comment!