
So remember how I recently shared about shopping at Consumer Crafts? Well today I’m going to show you the 3-D Butterfly Wall I made with some of the supplies from from my order. It’s actually a project I’ve been wanting to do for a while now, but just hadn’t gotten to it with the Fall rush. But I was glad to have the little extra push to get it done.
It’s been several months since we refinished our upstairs bedrooms. In fact, we put beds in the rooms the day before I went to the hospital to have Maya. So with all the craziness of a new baby, decorating has been a little neglected. Until the past 2 weeks, the girls’ room has literally had nothing on the walls and we’ve had black fabric hung over the windows in place of curtains. Sad, but true. But then I got a few things on the walls and started on one of my favorite features of the room--the sloped ceilings! I love their room. It’s painted such a beautiful color and all the angles and corners are truly enchanting.

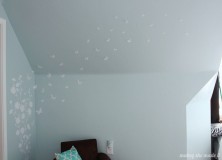
I wanted a place for the girls to sit and read, and this little corner was just right. I also wanted something whimsical and imaginative, and butterflies were the perfect candidate. I imagined them taking off from a flower decal I previously placed on the wall and flying off into the distance on the sloped ceiling. And it turned out so much fun.

3-D Butterfly Wall Supplies

- Electronic cutter, mat, and blade
- White vinyl
- Vellum
- Glue Dots Lines
Instructions
-
- Create a cut file with butterflies of various sizes, and cut from white vinyl
-
- Cut second copy of file from vellum
-
- Apply vinyl butterflies to the wall in a random pattern starting with the largest butterflies at the bottom and the smallest ones at the top.

- Apply vinyl butterflies to the wall in a random pattern starting with the largest butterflies at the bottom and the smallest ones at the top.
- Fold vellum butterflies in half, and adhere to the vinyl butterflies using the Glue Dots Lines on the butterfly body. You can make them all 3-D or leave some flat.


I'd love to hear your thoughts–leave me a comment!