If you’re ready to celebrate spring, this easy wreath that I shared over at Sisters, What! is a fun way to perk up your decor.
 Good morning! I’m Lisa Mabey, and I blog at Mabey She Made It, a simple sewing, crafts, and home decor blog with a classic feel. I’m so glad to be here sharing a little spring wreath with you with cute butterflies.
I have a simple uncomplicated style, which makes creating projects easy to do. Follow along as we make this butterfly spring wreath!

Butterfly Spring Wreath Supplies:
- Burlap wreath (mine is burlap ribbon wrapped around a wire frame)
- White glitter card stock
- Decorative paper with butterflies (or a butterfly punch)
- Scissors
- Pink decorative paper
- Spring sticker (or print a fun saying on paper and cut it out)
- Resin flowers
- 1/8″ ribbon
- Hole punch
- Dimensional foam tape
Instructions
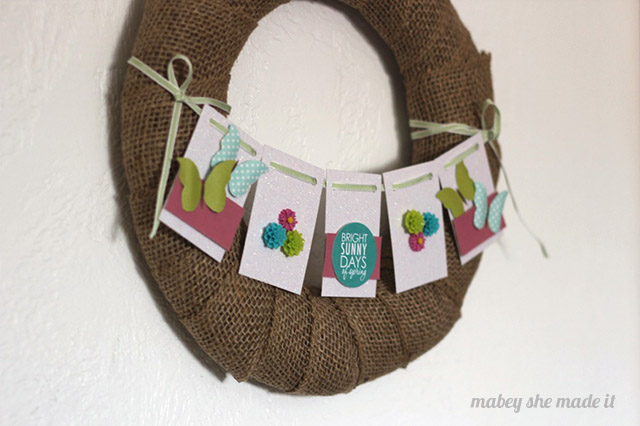
- Cut your card stock into five 2″ x 6″ pieces, and punch two holes in the top of each piece with a hole punch to create banner pieces.

- Cut three 1-1/2″ x 2″ pieces of pink paper, and adhere them to three banner pieces with dimensional tape.

- Cut or punch butterflies from decorative paper, and curl wings around your finger to give them dimension. Adhere to two banner pieces over the pink strips.

- Adhere spring sticker or printed greeting to third pink strip.
- Adhere resin flowers to remaining two banner pieces using dimensional foam tape. Your pieces are finished!

- String 1/8″ ribbon through punched holes, and tie it to your burlap wreath.

I’d love it if you came to Mabey She Made It for more fun spring projects like these:


Spring Candle Holder | April Showers Watercolor | Dreaming of Spring art


I'd love to hear your thoughts–leave me a comment!