Wood Spools Stool Supplies
The links below may be affiliate links. Purchasing through the link may give me a small percentage of that purchase with no extra expense to you.
Before we get to the supply list, can I share a big tip with you? Did you know you can order supplies from Home Depot online and pick them up at the store in an hour? If you have kids or just aren’t familiar with where to find things, this can save you so much time and headache! Just order it online and when you get to the store your order will be waiting for you at the Online Pickup (service) desk. Its so easy!
- 2 wire spools (check with electricians, home improvement stores, or local sale sites for spools)
- Pliers
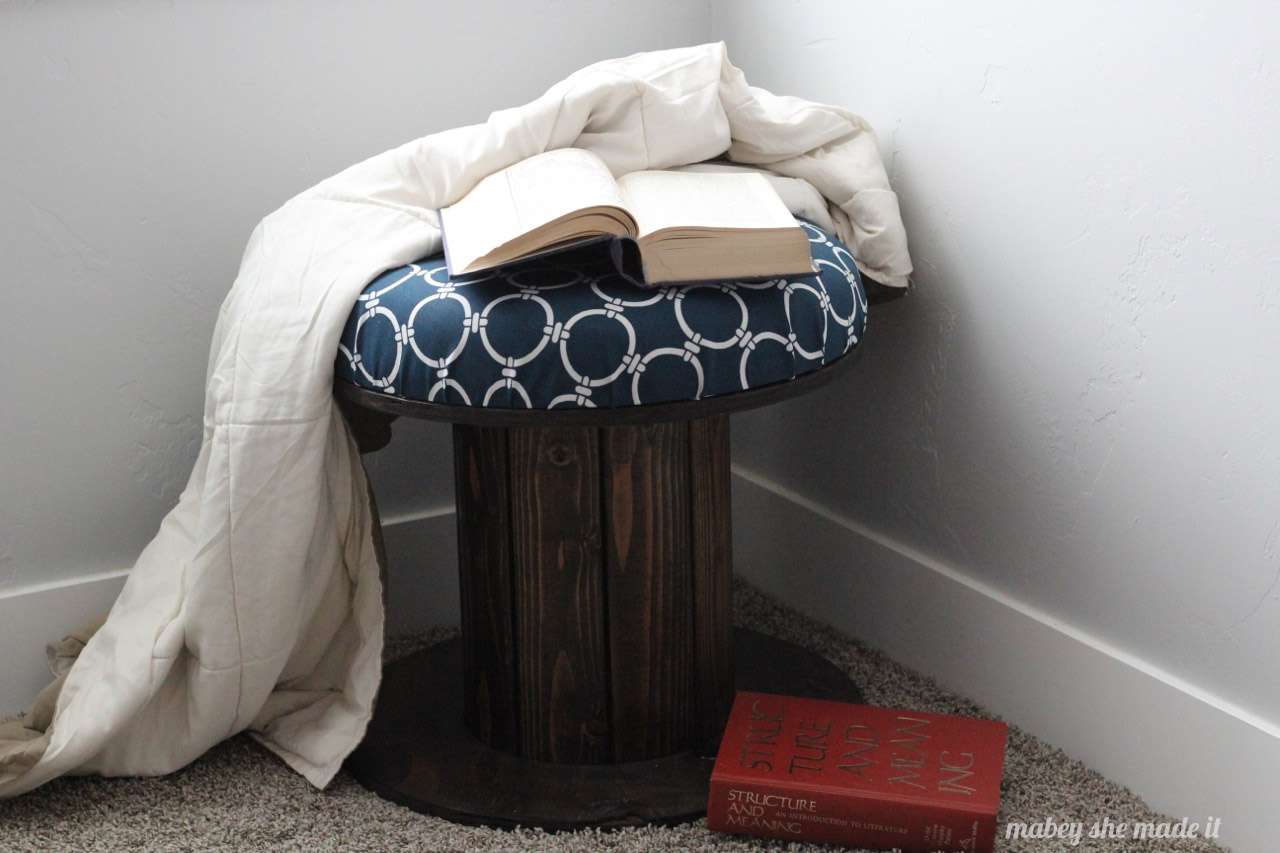
- Wood Stain (I used a dark walnut from Minwax)
- Clear coat
- Stapler and staples
- Upholstery Foam
- Electric knife (for cutting the foam–so much easier than using a knife!)
- Upholstery fabric
- Drill and screwdriver (Chad swears by Mikita–don’t waste your money on a cheap drill!)
TIP: Buy your foam at Home Depot for a fraction of the price it would cost at a craft store.
Instructions
- Clean and sand the edges on one of your spools. Then stain it, and let dry.
- Once dry, spray a clear coat on it to give it a little finish and shine.
- Take the second spool apart using the pliers (just unscrew the 4 long bolts on one side, and the whole thing comes right apart) and use one circle for your upholstery base.
- Trace the circle onto your foam, and cut out foam using an electric knife.
- Put your fabric right side down, then lay your foam and wood circle on top (see this tutorial for more photos of the process). Cut a circle several inches bigger than your foam/board, and use the stapler to staple the fabric around the board, stretching and pulling the fabric taut as you go. Use lots of staples since it’s round.
- Attach the upholstered seat to the stained spool using the drill and screwdriver.
Little by little, this room is coming together. It’s fun little touches like this stool that makes me feel more at home and love my little space. It’s the perfect place for curling up with a book or just gazing out the window.
Want to see more of this room? Check out these other posts!
Pom Pom Pillow Sham || Life Preserver Gallery Wall
Pages: 1 2
Lo-ove your spool stool. I hope this means you’ll be getting more to repurpose!
I hope so too! But I think it will be a while.
Looks great! love the dark stain and fabric. 🙂
Thanks Jamie. The dark stain really transformed it for me.
This is adorable – and what a great hubby to think of you wanting these!
He really is. I think I’ll keep him. 🙂
Cute. I love the transformation!
Thanks Jillene!
Now, I bet he’ll never ask you again “what are you going to do with them.” He just needs to trust in the creative genius of his wife and bring you all the stools and things he can find on job sites! Great job, and what a great addition to the bedroom.
Haha, he will probably still ask. Since we move regularly we don’t need extra “stuff” but hopefully this will sell when I’m done with it.
I need Chad to find me some spools! i love this so cute! Thank you for contributing to The Sunday Brunch Magazine, So great to have you join us, kind regards Eliza & Bel x
Spools for everyone! Ha ha. Thanks for including me, Bel!
This is one awesome post.Thanks Again.
I’ve been storing several spools for almost two years, with the instructions cashed in my favorites list for just as long. My roommate threatened to throw them out if I don’t finish by May, so I finally had the motivation I needed to get started! I’m down to the last step, but the seat does not sit flat because the bolt and nut securing the spool together jut out almost half an inch. Did you have this issue? If so, how did you solve it? And how many screws did you use to secure the seat to the spool?
Hmm, my bolts were recessed so I didn’t run into that issue. You could try scraping away some of the wood where the bolt goes in to make it sit lower in the hole. I hope that helps. I think we put about 4-6 screws in to hold the seat on (I sold this piece, so I can’t check exactly).
What’s up,I log on to your new stuff named “Upcycling Wood Spools to a Stool | Mabey She Made It” regularly.Your writing style is awesome, keep doing what you’re doing! And you can look our website about love spell.
[…] extra seating without taking up a lot of space? A wire spool stool makes a nice addition to any room, and you can tuck it in a corner if you’re in a small […]
[…] Source : Mabey She Made It […]
Hello,nice share.
[…] If you want to make a stool for your small nook then try it. It will give an attractive look in the corner of the bedroom. It is bright and beautiful to look at. So instead of buying stools from the market, make your own. Now get ready to make this DIY without delay. Project details […]
[…] plant stand to spruce up your indoor or outdoor space. The complete step-by-step guide is available here that can be followed even by a […]